Lesson 2: Moving Dots
Our goal in this lesson is to generate a function that displays a field of moving dots, allowing for parameters such as the number of dots, aperture size, coherence, color and direction.
Contents
We'll start by using the Screen function's 'DrawDots' command to put up a stationary field of dots. We first need to define the positions of the dots.
We'll define these positions in 'real world' coordinates, where (0,0) is the center of the screen, positve values of y are in the upper half of the screen, and the units will be in degrees of visual angle.
Let's define a structure 'dots' that holds the paramters for the field of dots:
dots.nDots = 100;                % number of dots
dots.color = [255,255,255];      % color of the dots
dots.size = 10;                   % size of dots (pixels)
dots.center = [0,0];           % center of the field of dots (x,y)
dots.apertureSize = [12,12];     % size of rectangular aperture [w,h] in degrees.
Now we'll define a random position within the aperture for each of the dots. 'dots.x' and 'dots.y'will hold the x and y positions for each dot.
dots.x = (rand(1,dots.nDots)-.5)*dots.apertureSize(1) + dots.center(1);
dots.y = (rand(1,dots.nDots)-.5)*dots.apertureSize(2) + dots.center(2);
What's the logic here? 'rand(dots.nDots,1)' generates a column vector dots.nDots long of random numbers between 0 and 1. To change that range to fit the aperture we subtract .5 from those numbers, multiply them by the aperture size, and add the center offset. Get it?
For fun we can plot those positions on top of an aperture in a regular matlab figure:
figure(1)
clf
%draw the aperture
patch([-.5,-.5,.5,.5]*dots.apertureSize(1)+dots.center(1), ...
    [-.5,.5,.5,-.5]*dots.apertureSize(2)+dots.center(2),[.8,.8,.8]);
hold on
plot(dots.x,dots.y,'ko','MarkerFaceColor','b');

xlabel('X (deg)');
ylabel('Y (deg)');
axis equal
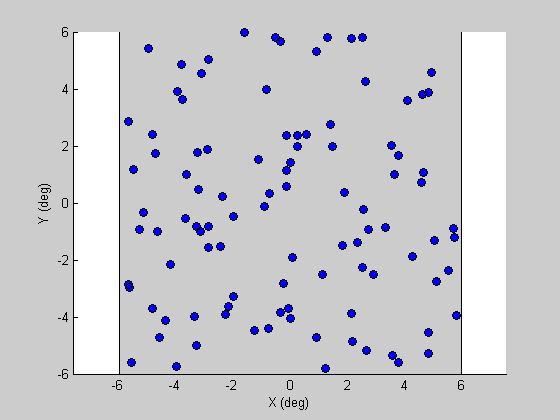
Although this section isn't really about plotting, it's worth noting some of the tricks used to make this plot. The 'patch' function draws a gray patch before plotting the dots. [.8,.8,.8] refers to the [r,g,b] values for the color of the patch. Note that psychToolbox uses values between 0 and 255 (for an 8-bit monitor) for colors, but Matlab's figures use values between 0 and 1.
'hold on' allows subsequent plotting commands to draw on top of the existsing plot, rather than erasing and starting fresh.
'MarkerFaceColor' is an optional attribute that you can send into the plot command to set the color of the symbols (in this case the symbols are black-bordered circles, defined by 'ko').
Next we'll convert these dot positions from visual angle into pixel coordinates. To do this, we need three pieces of information:
- The pixel resolution of the screen # The width of the screen in real units (we'll use centimeters) # The distance of the screen from the observer in centimeters.
To do this right you'll need a ruler. For this example I'll use numbers that approximate the dimensions I have on my laptop for me sitting in my office. We'll put these values in the 'display' structure:
display.dist = 50;  %cm
display.width = 30; %cm
We need to determine the screen resolution, too. We can do this by calling Screen's 'Resolution' function which returns a structure holding the values we want:
tmp = Screen('Resolution',0);
display.resolution = [tmp.width,tmp.height];
Converting from visual angle to pixels and back isn't hard. If a is the visual angle,d is the distance to the monitor, and x is the number of pixels on the screen, then:

Converting from visual angle to pixels is done by solving for a:

and converting from pixels to visual angle is done by solving for x:

I've written two functions that perform these calculations: pix2angle and angle2pix. Both take in the 'display' structure as the first argument. You can see how they're used by using 'help', and you can, of course, look at the code itself.
For this example we need 'angle2pix':
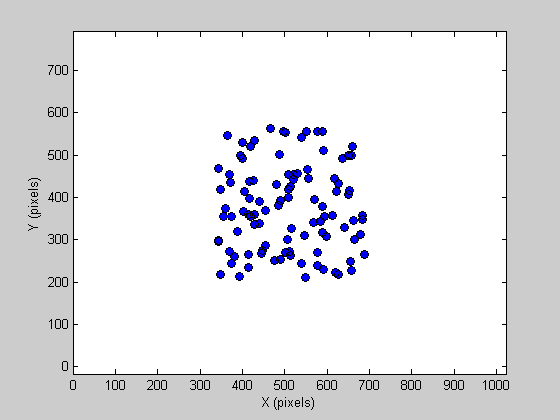
pixpos.x = angle2pix(display,dots.x);
pixpos.y = angle2pix(display,dots.y);
%
% This generates pixel positions, but they're centered at [0,0].  The last
% step for this conversion is to add in the offset for the center of the
% screen:
%
pixpos.x = pixpos.x + display.resolution(1)/2;
pixpos.y = pixpos.y + display.resolution(2)/2;
%
% We can make a similar plot of the pixel positions:
figure(2)
clf
plot(pixpos.x,pixpos.y,'ko','MarkerFaceColor','b');
set(gca,'XLim',[0,display.resolution(1)]);
set(gca,'YLim',[0,display.resolution(2)]);
xlabel('X (pixels)');
ylabel('Y (pixels)');
axis equal
The 'DrawDots' command
We're ready to show these dots using the 'Screen' function and the 'DrawDots' command. You can learn more about 'DrawDots' by typing Screen('DrawDots?');
Note that the last two arguments in the DrawDots command are the center of the screen [0,0] and the 'dot type' which when set to 1 draws circular dots (rather than square dots by default).
try
    display.skipChecks=1;
    display = OpenWindow(display);
    Screen('DrawDots',display.windowPtr,[pixpos.x;pixpos.y], dots.size, dots.color,[0,0],1);
    Screen('Flip',display.windowPtr);
    pause(2)
catch ME
    Screen('CloseAll');
    rethrow(ME)
end
Screen('CloseAll');
Now let's make them move! We need to define some timing and motion parameters, which we'll append to the 'dots' structure:
dots.speed = 3;       %degrees/second
dots.duration = 5;    %seconds
dots.direction = 30;  %degrees (clockwise from straight up)
Our First Animation
Animation is performed by updating the dot position on each frame and re-drawing the frame. We need to know the frame-rate of our monitor so that we can calculate how much we need to change the dot positions on each frame. Fortuantely, our 'OpenWindow' function appends the field 'frameRate' to the 'display' structure.
The distance traveled by a dot (in degrees) is the speed (degrees/second) divided by the frame rate (frames/second). The units cancel, leaving degrees/frame which makes sense. Basic trigonometry (sines and cosines) allows us to determine how much the changes in the x and y position.
So the x and y position changes, which we'll call dx and dy, can be calculated by:
dx = dots.speed*sin(dots.direction*pi/180)/display.frameRate;
dy = -dots.speed*cos(dots.direction*pi/180)/display.frameRate;
The total number of frames for the animation is determined by the duration (seconds) multiplied by the frame rate (frames/second). Although it's a simple calculation, I've made a function to convert from seconds to frames so I don't ever have to think about it again:
nFrames = secs2frames(display,dots.duration);
We're ready to animate:
try
    display = OpenWindow(display);
    for i=1:nFrames
        %convert from degrees to screen pixels
        pixpos.x = angle2pix(display,dots.x)+ display.resolution(1)/2;
        pixpos.y = angle2pix(display,dots.y)+ display.resolution(2)/2;

        Screen('DrawDots',display.windowPtr,[pixpos.x;pixpos.y], dots.size, dots.color,[0,0],1);
        %update the dot position
        dots.x = dots.x + dx;
        dots.y = dots.y + dy;

        Screen('Flip',display.windowPtr);
    end
catch ME
    Screen('CloseAll');
    rethrow(ME)
end
Screen('CloseAll');
Keeping the Dots in the Aperture
Oops! We're almost there. We need to deal with dots moving beyond the edge of the aperture. This requrires a couple more lines of code:
First we'll calculate the left, right top and bottom of the aperture (in degrees)
l = dots.center(1)-dots.apertureSize(1)/2;
r = dots.center(1)+dots.apertureSize(1)/2;
b = dots.center(2)-dots.apertureSize(2)/2;
t = dots.center(2)+dots.apertureSize(2)/2;
New random starting positions
dots.x = (rand(1,dots.nDots)-.5)*dots.apertureSize(1) + dots.center(1);
dots.y = (rand(1,dots.nDots)-.5)*dots.apertureSize(2) + dots.center(2);

try
    display = OpenWindow(display);
    for i=1:nFrames
        %convert from degrees to screen pixels
        pixpos.x = angle2pix(display,dots.x)+ display.resolution(1)/2;
        pixpos.y = angle2pix(display,dots.y)+ display.resolution(2)/2;

        Screen('DrawDots',display.windowPtr,[pixpos.x;pixpos.y], dots.size, dots.color,[0,0],1);
        %update the dot position
        dots.x = dots.x + dx;
        dots.y = dots.y + dy;

        %move the dots that are outside the aperture back one aperture
        %width.
        dots.x(dots.x<l) = dots.x(dots.x<l) + dots.apertureSize(1);
        dots.x(dots.x>r) = dots.x(dots.x>r) - dots.apertureSize(1);
        dots.y(dots.y<b) = dots.y(dots.y<b) + dots.apertureSize(2);
        dots.y(dots.y>t) = dots.y(dots.y>t) - dots.apertureSize(2);

        Screen('Flip',display.windowPtr);
    end
catch ME
    Screen('CloseAll');
    rethrow(ME)
end
Screen('CloseAll');
Note how we dealt with the dots that had moved outside the aperture. You might think that if a dot moves off, say, the left edge, then we would place it over on the right side of the aperture. The problem with this is that it disrupts the randomness of the dot field - dots will tend to form lines parallel to the aperture edges.
Limited Lifetime Dots
This isn't actually the way vision researchers and physiologists do it. The problem is that you can track the individual dots, which makes this a sort of 'type 2' motion stimulus. To tap in to the 'motion energy' system of the visual system we need to make the dots untrackable. One way to do this is to give them 'limited lifetime' so that each dot moves to a random place after moving for a certain number of frames. Here's one way to do it:
dots.lifetime = 12;  %lifetime of each dot (frames)

% First we'll calculate the left, right top and bottom of the aperture (in
% degrees)
l = dots.center(1)-dots.apertureSize(1)/2;
r = dots.center(1)+dots.apertureSize(1)/2;
b = dots.center(2)-dots.apertureSize(2)/2;
t = dots.center(2)+dots.apertureSize(2)/2;

% New random starting positions
dots.x = (rand(1,dots.nDots)-.5)*dots.apertureSize(1) + dots.center(1);
dots.y = (rand(1,dots.nDots)-.5)*dots.apertureSize(2) + dots.center(2);

% Each dot will have a integer value 'life' which is how many frames the
% dot has been going.  The starting 'life' of each dot will be a random
% number between 0 and dots.lifetime-1 so that they don't all 'die' on the
% same frame:

dots.life =    ceil(rand(1,dots.nDots)*dots.lifetime);

try
    display = OpenWindow(display);
    for i=1:nFrames
        %convert from degrees to screen pixels
        pixpos.x = angle2pix(display,dots.x)+ display.resolution(1)/2;
        pixpos.y = angle2pix(display,dots.y)+ display.resolution(2)/2;

        Screen('DrawDots',display.windowPtr,[pixpos.x;pixpos.y], dots.size, dots.color,[0,0],1);
        %update the dot position
        dots.x = dots.x + dx;
        dots.y = dots.y + dy;

        %move the dots that are outside the aperture back one aperture
        %width.
        dots.x(dots.x<l) = dots.x(dots.x<l) + dots.apertureSize(1);
        dots.x(dots.x>r) = dots.x(dots.x>r) - dots.apertureSize(1);
        dots.y(dots.y<b) = dots.y(dots.y<b) + dots.apertureSize(2);
        dots.y(dots.y>t) = dots.y(dots.y>t) - dots.apertureSize(2);

        %increment the 'life' of each dot
        dots.life = dots.life+1;

        %find the 'dead' dots
        deadDots = mod(dots.life,dots.lifetime)==0;

        %replace the positions of the dead dots to a random location
        dots.x(deadDots) = (rand(1,sum(deadDots))-.5)*dots.apertureSize(1) + dots.center(1);
        dots.y(deadDots) = (rand(1,sum(deadDots))-.5)*dots.apertureSize(2) + dots.center(2);

        Screen('Flip',display.windowPtr);
    end
catch ME
    Screen('CloseAll');
    rethrow(ME)
end
Screen('CloseAll');
Using a Circular Aperture
Circular apertures are common for moving fields of dots. An easy way to restrict our dots to a circular (or more generally an elliptical) aperture is to use the equation of an ellipse to create a binary 'mask'. The equation of an ellipse is:
where $x_c and $y_c is the center
try
    display = OpenWindow(display);

    %Use the equation of an ellipse to determine which dots fall inside.
    goodDots = (dots.x-dots.center(1)).^2/(dots.apertureSize(1)/2)^2 + ...
        (dots.y-dots.center(2)).^2/(dots.apertureSize(2)/2)^2 < 1;

    pixpos.x = angle2pix(display,dots.x)+ display.resolution(1)/2;
    pixpos.y = angle2pix(display,dots.y)+ display.resolution(2)/2;

    %Draw only the 'good dots'
    Screen('DrawDots',display.windowPtr,[pixpos.x(goodDots);pixpos.y(goodDots)], dots.size, dots.color,[0,0],1);

    Screen('Flip',display.windowPtr);
    pause(5)
catch ME
    Screen('CloseAll');
    rethrow(ME)
end
Screen('CloseAll');
Exercises
- Use what we just learned to make the dots move within a circular aperture.
- Give each dot direction a random number to create an 'uncorrelated noise' stimulus. Hint: instead of dx and dy being a single number, make them vectors of length dots.nDots.
- How many dots can you draw? If you have too many dots, it'll take more than a frame's duration to calculate and draw and you'll start 'skipping frames'. Adjust 'dots.nDots' to see where the timing starts breaking.